Comment télécharger une capture d'écran
Bienvenue! Apprenez à télécharger facilement une capture d'écran.
Source licence-activation.fr
What are the different ways to télécharger capture d'écran?
Télécharger capture d'écran is the French term for downloading a screen capture tool. Here are some of the different ways you can télécharger capture d'écran:
1. Built-in capture d'écran tools on your device
Many devices come with a built-in capture d'écran tool. For example, Windows computers have a Snipping Tool or a Print Screen function that allows you to capture a specific area or the entire screen, respectively. On Mac, you can use the Command + Shift + 5 keys to take screenshots or recordings. Similarly, smartphones and tablets usually have a built-in screenshot function, such as pressing the Power and Volume Down buttons together on an Android device.
2. Third-party screen capture software
There are many screen capture software options available online for download, such as Greenshot, Lightshot, or Snagit. These tools usually offer more advanced features than the built-in capture d'écran tools, such as allowing you to annotate and edit the captured image or record videos of your screen.
3. Web-based screen capture tools
Several websites allow you to take screenshots directly from your browser without having to download any software. For example, Screenpresso or Nimbus Screenshot offer this feature. However, keep in mind that these tools might not work as well as downloadable software, especially if you need to capture multiple screens or a video recording.
4. Browser extensions
Some web browsers, such as Google Chrome or Mozilla Firefox, have extensions that allow you to take screenshots of web pages. For example, Awesome Screenshot or Fireshot are two popular options. These extensions usually come with additional features such as editing or sharing the captured image directly from the browser.
How to use a capture d'écran tool?
Once you have télécharger capture d'écran, here are the general steps to using a screen capture tool:
1. Open the screen capture tool
Depending on the type of tool you have, you might need to open the software or extension on your device or browser.
2. Select the area to capture
Some tools allow you to capture the entire screen, while others let you select a specific area or window. Choose the appropriate option for your needs.
3. Capture the screen
Click on the "Capture" or "Screenshot" button to capture the image or video recording. Some tools might require additional steps, such as choosing the file format or naming the file.
4. Edit or annotate the captured image
If your tool offers editing features, such as adding text, arrows, or highlighting, you can use these options to make the captured image more informative or clear.
5. Save or share the captured image
Once you are satisfied with the captured image, save it to your device or share it directly from the capture d'écran tool. Some tools might also offer options to upload the image to the cloud or send it to another person via email or social media.
Conclusion
Télécharger capture d'écran can be a useful tool for taking snapshots or recordings of your screen. There are many different options available for capturing your screen, from built-in tools on your device to more advanced third-party software. Once you have downloaded a capture d'écran tool, using it is usually simple and straightforward, allowing you to save or share the captured image with ease.
Introduction
Capturing a screenshot (Capture d'écran) is a handy function when you need to save or share a specific image or information on your computer. Télécharger capture d'écran on a Windows computer is a simple process that can be achieved through several methods. In this article, we will explore the different ways to take a screenshot on a Windows computer using the built-in functions.How to Télécharger Capture d'écran on a Windows Computer
Using the Snipping Tool
The Snipping Tool is a popular and built-in function in Windows that allows you to select and take a screenshot of a specific area on your screen. Follow the steps below to use the Snipping Tool:1. Open the Snipping Tool on your Windows computer. The tool can be found by searching for it in the Start menu.2. Click on the "New" button located in the top left corner of the Snipping Tool window.3. Select the area that you want to capture by clicking and dragging the cursor over the desired area. Once the area is selected, release the mouse button.4. The selected area will now appear in the Snipping Tool window. If you want to draw or highlight anything on the image, click on the "Pen" or "Highlighter" tool located at the top of the window.5. To save the captured image, click on the "File" option in the top left corner of the Snipping Tool window. Click "Save As" and choose where to save the file on your computer.Using the Print Screen Key
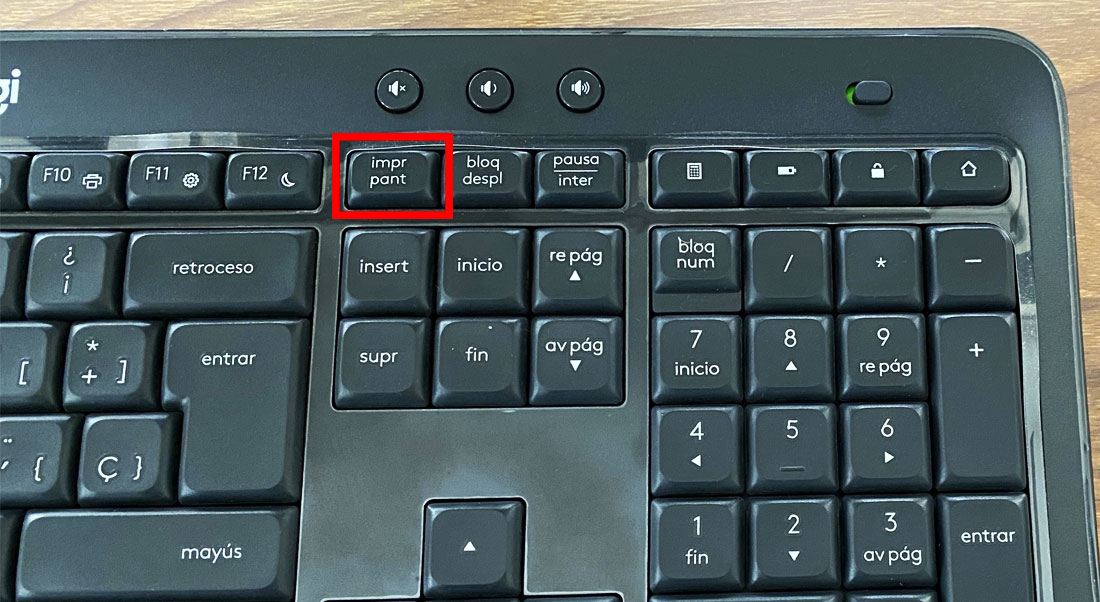
The Print Screen key is a simple way to take a screenshot of your entire screen on a Windows computer. Follow the steps below to use the Print Screen key:1. Press the Print Screen key on your keyboard. The key is usually located in the top right corner of your keyboard.2. Open an image editing program such as Paint or Photoshop.3. Right-click and select "Paste" or use the keyboard shortcut "Ctrl + V" to paste the captured image onto the canvas.4. To save the captured image, click on the "File" option in the top left corner of the image editing program. Click "Save As" and choose where to save the file on your computer.Using the Windows Game Bar
The Windows Game Bar function was introduced in Windows 10 and includes a Capture d'écran function that can be useful for taking pictures during gameplay or other full-screen activities. Follow the steps below to use the Windows Game Bar:1. Open the application or game that you want to take a screenshot of.2. Press the Windows key + G on your keyboard to open the Windows Game Bar.3. Click on the "Capture" button located in the top center of the Game Bar window.4. The captured image will appear in a notification window at the bottom right of your screen. Click on the notification to open the captured image in the Photos app.5. To save the captured image, click on the "Save As" option and choose where to save the file on your computer.Conclusion
Capturing a screenshot on a Windows computer is a simple process that can be achieved by using the built-in Snipping Tool, Print Screen key, or Windows Game Bar functions. By following the steps outlined in this article, you can easily Télécharger capture d'écran on your Windows computer and save or share important information or images.Comment Télécharger Capture d'écran sur un ordinateur Mac
Capturer une partie ou la totalité de l'écran d'un ordinateur Mac est une fonctionnalité utile pour de nombreuses raisons différentes. Dans cet article, nous vous montrerons comment télécharger Capture d'écran sur votre Mac ordinateur en utilisant des raccourcis clavier, l'application Grab, et l'application Preview.Utilisation de raccourcis clavier
Les raccourcis clavier ci-dessous vous permettent de capturer différentes parties de votre écran :- Commande + Shift + 3 : Capture la totalité de l'écran- Commande + Shift + 4 : Capture une partie sélectionnée de l'écran- Commande + Shift + 4, puis barre d'espace : Capture la fenêtre activeUne fois que vous avez utilisé un raccourci clavier pour prendre une capture d'écran, vous pouvez la retrouver sur votre bureau sous forme de fichier PNG avec un nom composé du préfixe "Capture d'écran" suivi de la date et de l'heure.Utilisation de l'application Grab
L'application Grab est un outil de capture d'écran intégré à macOS. Pour l'utiliser, suivez les étapes ci-dessous :1. Ouvrez l'application Grab à partir du dossier Applications -> Utilitaires2. Sélectionnez l'option "Fenêtre" ou "Sélection" dans le menu déroulant "Capture"3. Cliquez sur l'icône de la caméra pour prendre une capture d'écran4. Enregistrez la capture d'écran à l'emplacement souhaitéUtilisation de l'application Preview
L'application Preview inclut également une fonctionnalité de capture d'écran. Suivez les étapes ci-dessous pour l'utiliser :1. Ouvrez l'application Preview2. Sélectionnez "Capture d'écran" dans le menu "Fichier"3. Choisissez l'option "Sélection", "Fenêtre" ou "Écran entier"4. Prenez la capture d'écran5. Enregistrez la capture d'écran à l'emplacement souhaitéEn conclusion, il existe plusieurs façons de télécharger Capture d'écran sur un ordinateur Mac. Les raccourcis clavier sont les plus rapides et les plus simples, tandis que l'application Grab et l'application Preview offrent plus de fonctionnalités et d'options de personnalisation. Quelle que soit la méthode que vous choisissez, capturer des images de votre écran est un excellent moyen de prendre des notes, de faire des présentations, ou de partager des informations avec d'autres personnes.Introduction
Capture d'écran is a French term that translates to "screenshot" in English. Taking a Capture d'écran is a useful tool that allows you to capture images of what is displayed on your computer or mobile screen. This can be helpful for a variety of reasons, such as capturing an error message, saving a photo or image, or sharing something with others.Why Télécharger Capture d'écran is important
Being able to take a Capture d'écran on your mobile device is important for a variety of reasons. For example, if you are trying to troubleshoot an issue on your phone or tablet, a Capture d'écran can be helpful for showing others exactly what you are seeing. Additionally, if you want to share a funny or interesting post with your friends on social media, a Capture d'écran is a great way to do so.How to Télécharger Capture d'écran on Mobile Devices
Using Android Built-in Tools
Android devices have a variety of built-in tools for taking Capture d'écrans. Here are some common methods:- Press and hold the power button and volume down button simultaneously until the screen flashes. The Capture d'écran will then be saved to your photo gallery.
- If your phone supports it, you can use a palm swipe gesture by swiping your hand across the screen from right to left. This will also save a Capture d'écran to your photo gallery.
- Many Android devices also have a "Capture d'écran" button in the quick settings panel that can be accessed by swiping down from the top of the screen. This button will take a Capture d'écran when pressed.
Using iOS Built-in Tools
iOS devices also have a variety of built-in tools for taking Capture d'écrans. Here are some common methods:- Press and hold the power button and home button simultaneously until the screen flashes. The Capture d'écran will then be saved to your photo gallery.
- If your device supports it, you can use AssistiveTouch by going to Settings > General > Accessibility > AssistiveTouch and enabling the feature. This will add a virtual button to your screen that can be used to take a Capture d'écran.
Using Third-Party Apps
In addition to built-in tools, there are also many third-party apps available for both Android and iOS devices that offer additional features and customization options for taking Capture d'écrans. Some popular apps include:| App Name | Platform | Features |
|---|---|---|
| Screen Capture | Android | Customizable settings, including delay timers and image quality |
| Snagit | iOS | Annotation tools, customizable sharing options |
| Gyazo | Windows, Mac, iOS, Android | Cloud-based storage and sharing, annotation tools, customizable keyboard shortcuts |
Conclusion
In conclusion, taking a Capture d'écran is a useful tool for capturing and sharing images of your mobile screen. Whether you use built-in tools or third-party apps, there are many ways to take high-quality Capture d'écrans on your device. By following the steps outlined in this article, you can become an expert at taking Capture d'écrans and sharing them with others.Introduction: Télécharger Capture d'écran
La capture d'écran est un processus simple et efficace pour enregistrer l'image d'une page web, d'un message d'erreur ou d'une image à partir de votre ordinateur ou de votre téléphone portable. Télécharger capture d'écran est devenu un outil commun dans le monde numérique, car il peut être utilisé dans diverses situations, des besoins professionnels aux besoins personnels.
Dans cet article, nous explorerons les avantages de prendre capture d'écrans et les différentes méthodes pour y parvenir sur différents appareils. Nous examinerons également comment choisir le bon outil pour le travail et fournissons des conseils pour rendre le processus de capture d'écran plus efficace.
Benefits of Taking Capture d'écrans
Il y a plusieurs avantages de prendre capture d'écran, que ce soit pour des besoins professionnels ou personnels. Certains des avantages les plus courants incluent:
1. Documenter les erreurs
Si vous rencontrez une erreur lors de l'utilisation d'un programme ou d'un site web, prendre capture d'écran peut être une manière rapide d'enregistrer le message d'erreur qui apparaît à l'écran. Vous pouvez utiliser ceci pour montrer l'erreur à un collègue ou à un support technique pour demander de l'aide pour la résoudre.
2. Créer des aides visuelles pour les présentations
Si vous donnez une présentation et que vous souhaitez inclure une image d'un site web ou d'un programme, prendre capture d'écran peut être une façon rapide et facile de le faire. Vous pouvez également utiliser la capture d'écran pour prendre des photos de graphiques ou de tableaux pour inclure dans votre présentation.
3. Garder une trace de l'information importante
Si vous trouvez des informations importantes en ligne que vous souhaitez enregistrer pour un usage futur, prendre capture d'écran peut être une façon rapide et facile de le faire. Vous pouvez enregistrer des recettes, des informations de voyage ou des informations bancaires en prenant des captures d'écrans pour les garder à portée de main.
4. Capturer des moments importants
Si vous souhaitez capturer un moment important à l'écran, comme une vidéo amusante ou une image drôle, prendre capture d'écran est une façon rapide et facile de le faire. Vous pouvez également utiliser la capture d'écran pour enregistrer des chats en ligne ou d'autres événements importants qui se produisent sur votre ordinateur.
Choosing the Right Tool for the Job
Il y a plusieurs méthodes différentes pour prendre capture d'écran sur différents appareils, chacun avec ses avantages et ses inconvénients. En choisissant le bon outil pour le travail, vous pouvez rendre le processus de capture d'écran plus facile et plus efficace. Voici quelques-unes des méthodes les plus courantes pour prendre capture d'écran:
1. Utiliser le raccourci clavier
Pour les ordinateurs de bureau et les ordinateurs portables, la méthode la plus courante pour prendre capture d'écran est d'utiliser la fonction de raccourci clavier. Sur un ordinateur Windows, appuyez sur la touche "Print Screen" ou "PrtSc" pour enregistrer une capture d'écran de tout l'écran. Sur un ordinateur Mac, appuyez sur les touches "Commande" + "Shift" + "3" pour enregistrer une capture d'écran de tout l'écran ou "Commande" + "Shift" + "4" pour enregistrer une capture d'écran d'une partie spécifique de l'écran.
2. Utiliser des programmes tiers
Il existe une variété de programmes tiers qui peuvent être téléchargés pour prendre capture d'écran, tels que Snipping Tool, Snagit et Greenshot. Ces programmes offrent souvent des fonctionnalités supplémentaires, telles que la possibilité d'enregistrer des captures d'écran en tant que fichiers PDF ou de les annoter avant de les partager.
3. Capturer des écrans sur des appareils mobiles
Sur un iPhone, appuyez simultanément sur le bouton "Home" et le bouton "Puissance" pour enregistrer une capture d'écran. Sur un appareil Android, appuyez simultanément sur les boutons "Volume Bas" et "Marche/Arrêt" pour enregistrer une capture d'écran.
En choisissant la bonne méthode pour votre appareil, vous pouvez rendre le processus de capture d'écran plus facile et plus efficace.
Conseils pour rendre le processus de capture d'écran plus efficace
Voici quelques conseils pour rendre le processus de capture d'écran plus efficace:
| 1. | Identifiez le contenu que vous souhaitez capturer à l'avance. |
| 2. | Utilisez des programmes tiers pour ajouter des annotations, des flèches ou des cercles pour rendre les images plus claires. |
| 3. | Organisez vos captures d'écran en dossiers pour les trouver facilement à une date ultérieure. |
| 4. | Si vous utilisez la fonction de capture d'écran sur votre téléphone portable, soyez conscient du niveau de batterie restant pour éviter de manquer des images importantes. |
| 5. | Utilisez des programmes optimisés pour la capture d'écran qui rendent la capture d'écran plus facile et plus rapide. |
En suivant ces conseils, vous pouvez rendre le processus de capture d'écran plus efficace et plus facile pour vous.
Conclusion: Capturing Screenshots Made Easy
Télécharger capture d'écran est devenu un outil commun dans le monde numérique pour documenter les erreurs, créer des aides visuelles pour les présentations, garder une trace de l'information importante et capturer des moments importants. En choisissant la bonne méthode pour votre appareil et en suivant les conseils pour rendre le processus plus efficace, vous pouvez prendre capture d'écrans avec facilité et efficacité.